Background

Monday 26 June 2017

Day 31

OMG I cannot believe I have actually been blogging for a whole month!
I have amazed even myself. LOL
Well I have been working really hard on new stamp releases and have spent all weekend colouring in the packaging for my Christmas Stitchy Release which is coming out very very soon....
Want a sneaky peak.... 
I can't show you full images but wonder if you can guess what we I have been drawing ;) x


Ha ha... I had to hide most of it!!!! 
But I think I may have shown enough :)
These will be on tv in about 3 weeks so I am excited that I will be able to bring you a lot of gorgeous samples soooon!
Hugs
Lisa xxxx

Sunday 25 June 2017

Day 30

Ooooh something a bit more masculine for me.
These are stamps by my lovely other half, Danny.
You can find the collection HERE.

This was created on a piece of MDF.
I painted it with Celery Acrylic Paint from Creative Expressions.
The Celery is opaque.  Over the top of this I used some of the Strawberry Syrup paint which is a translucent paint, allowing the colour of the celery to show through.
I then used a stencil with more of the Strawberry Syrup to create some depth to the background.


Once this has dried, I stamped on the acrylic paint using archival ink.
I find this works really well on MDF/paint as it is permanent and dries really well.
These stamps are from Danny's collections which I have given a link to above.
Once everything has dried, I sealed this with a Gloss Glue Seal and Glaze, also available from Creative Expressions.
What a fab project for a man, a grandad or even a teenage boy!

Have a fabulous day.
Hugs.
Lisa x

Saturday 24 June 2017

Day 29

Good morning everyone :)
Today I really really wanted to share with you some dies.
I created these cards for a One Day Special.  It was the first time that I was asked to work with dies and I utterly loved it.
These dies are called Perspectives and as you can see are all words.  But they are a different way of using them.    I am a clean and simple crafter and was worried that my style may not work with the dies.  How wrong could I be.

So today here are just a few samples for you.
Hope they inspire you in some way :)
You will see some are cut into the card. Some are cut out of the card.
Just using these dies with different papers and colours, I really think makes them into something special.
I really really really (can you tell I like these), enjoyed working with these Dies.
Have a lovely day!
Lisa xxxx

Friday 23 June 2017

Day 28

Well last night I went to Lily's new Secondary School to meet her tutor, pick out her uniform and walk away with a very very light pocket!!!
I cannot believe she has grown up so much; it brings a lump to my throat as she will be spreading her wings without her mum soon!... Oh goodness me. However, she is a beautiful girl, inside and out and I need to remember I am a lucky Mum.  

But on a lighter note, I am working on Christmas!  To be honest I have been working on Christmas since last Christmas. Ha Ha!

I am desperate to share so much with you but I am sworn to secrecy for 6 weeks! OMG How will I cope!

So sorry to say I can tell you nothing.......

So here is a card instead  :)


I took a 6x6 hammered card blank and I masked off a section right at the bottom of the page.
I left about a 1.5 inch space then  masked another section.
I took one of the stamps and stamped in the gap between the masking tape in 
Chrome Yellow and Venetian Orange Archival Ink.  I removed the tape and you can see this fabulous border.
Just above that border I stamped the clock from the set in a mix of the 2 archival colours.
I stamped off the page, which is one of my signature "things".  I think you can create great balance this way.
I used some white sparkling embossing powders to cover the Pop ems and layered them up as seen on the photo.
I then took a stamp from the same set, to stamp good time, and another stamp to create the clock hands.  I cut the hands out leaving a white edge. When I glued them on I raised them slightly for more dimension.
I then popped on some sequins to add balance.
I love this card.
Hope you do too.
Hugs
Lisa x

Thursday 22 June 2017

Day 27

Good morning
Wow I am so pleased we finally have a little breeze and cloud today.
Don't get me wrong, I love the hot weather but OMG this has been hot hot hot.
So, for something a little chillier I thought I would share this with you.....
Now this is just fresh.
It is the simplest card on the planet but I think it is very refreshing to see!

So I literally cut 3 circles from Sue Wilson's Double Pierced Circles Die.
I used one of my fabulus DCWV paper stacks (which you all know I love), and glued them on.
I then die cut 2 butterflies.  One I kept flat and plain, and the second I used a glittery card and gave the wings dimension.
After that I simply took a sentiment
"May your love bloom", and separated the words.
Thse were stamped directly onto the card.
And again, in five mins, voila!
Clean and fresh and still summery!
Hope you like it.
Hugs.
Lisa xxxx

Wednesday 21 June 2017

Day 26

Goooooood morning!!!!!!!!!!!!!
I thought I would mix it up a bit today.
We have a mixture of tropical dies and grungy stamps.  Who would have thought?

For this card, I created a background using my grungy stamps.
This floral one is called Silhouette Garden and is available HERE.
I used a couple of different coloured inks on the stamp and stamped around the page and off the edges.
I added some splats from my Tropical Grunge stamp set HERE.

I then used Sue Wilson's Message in a Bottle Die, and inked with a pastel purple inkpad.
I stamped the number 18 on the front using my fabulous Frame It! stamp set
available HERE

I finished off with some bakers twine and a button to add to the bottle and the mounted with foam pads to give dimension.
At the top you can see some Cosmic Shimmer PVA pearl glue to give the appearance of exploding Champagne!
Have a fabulous day.
Hope you like it.
Hugs
Lisa xxx


Tuesday 20 June 2017

Day 25

Danny's Stamps.....
My other half, Danny, whom most of you will know by now, created his own collection of stamps for Creative Expressions.  They loved them so much they were turned into grey mounted rubber stamp sets.
You can find them HERE.
They are utterly stunning..... and an absolute dream to work with.
This was created using the Watch the Birdie stamp set.
I used one of the Creative Expressions MDF Media Boards (available here).
I covered it with DCWV papers which I adore.
I inked around the edges using my vintage photo Distress Oxide Inkpads.
I stamped the sentiment in black Versafine and again, inked the edges.
I stamped the bird from the Watch the Birdie stamp set and cut out roughly.
I grabbed a few of my favourite Sue Wilson dies to create a floral border and 
glued my bird to one of the flowers.
This makes a great mantlepiece pleaser in my opinion!!!!
Hope you like it.
Hugs
Lisa xxxx

Monday 19 June 2017

Day 24

I thought I would share a video with you today.
Some of you may have seen this on my Facebook Page but for those who haven't, here is 18 minutes of me playing in my craft room.
Enjoy!
Hugs
Lisa xxx

Sunday 18 June 2017

Day 23

Pixie Powder!
Look at this.
I am so thrilled the way it came out
This is pixie powders sprinkled onto wartercolour card and then spritzed with water.
After it had dried, I used a piece of flower shaped MDF from Creative Expressions, to trace around and cut out.  I stuck the cutout pixie powder paper and glued to the MDF.
I also stamped onto the excess pieces of pixie'd card and cut out.
The result is below! Voila!
I love love love this! And so easy!

Hope you like it.
Hugs
Lisa x
Saturday 17 June 2017

Day 22

Hi everyone.
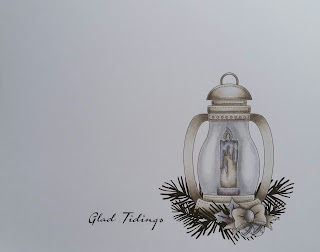
Today I am showing you a little card created with my Distress Crayons.
I really love playing with these, as they work in so many different ways.

For this card I first painted lightly over the surface with a gloss medium, and in this case, I used the Creative Expressions Gloss Glue Seal and Glaze.
This gives something for the crayons glide over.  If I had left the card uncoated, it can be really difficult to *move* the crayon smoothly.
I will try and show more ways of using these over the coming weeks!
So, after the card has been coated and left to dry, I embossed it to give some texture.

What I did next, was to take a few colours of the crayons and blended them over the white embossed card.
I then popped a Creative Expressions Mini Stencil - Diamonds, on top and used a wet wipe through the stencil which removes some of the crayon.  How cool!
I then embossed more card and die cut sections out (circles), to create depth and texture.
A cheeky sentiment was popped in the corner and that is it!
Voila!
Hope you like it.
Hugs
Lisa x

Friday 16 June 2017

Day 21

Morning!
Just a cheeky little card from me today.
This is super simple!
I have stamped my Doodled Borders stamps 5 times using 3 of one design and 2 of another.
I have coloured the stripy border with my Graphmaster Alcohol Markers

This is a fab card if you are on a tight timescale or are batch making.
I love its simplicity!

Ingredients:

Thursday 15 June 2017

Day 20

Good morning all!
Today I though I would show you a few cards I have made with my Dotty About You stamp collection
I utterly love this stamp set and is one of my go to's.

In this first sample I have used my Doodled Borders, masked off the bottom half of the card diagonally, and then stamped with black Versafine Ink.
I stamped out the flower and leaves, and the sentiment from the Stamp Set and "fussy cut" them, leaving a white border.
I added a diagonal panel in a coordinating teal colour to match the blue matt behind the image.

 The second sample is using the same stamp set, and masking of a diagonal  section and simply stamping all over the card with different colours of ink. 
I removed the mask to reveal the blank area.  
Stamp one of my Stylish Script stamps in the area to complete.

Here I am simply stamping all over the card with different colours of ink. 
Again, using the Dotty About You stamp set, stamp the sentiment over the top with black
Versafine Ink.


Just 3 ways of creating fab cards with little effort.

Ingredients:
Archival Inkpads by Wendy Vecchi

Wednesday 14 June 2017

Day 19

Oh my oh my.
I have had such a super exciting day!
I had a very very very special crafty delivery last week and I have been doing some testing of a brand new product of my very own.
My fingers have been itching to share samples with you but I can't!! Well not yet anyway!
So I need to distract myself and share some currently crafty goodness instead.

I have been working with Yupo and alcohol inks.
For those who haven't come across Yupo before, OMG!  Google it.  It is incredible.
It is a synthetic paper which works amazingly for artists, and crafters alike.
I have a sample or two here for you.
This is using my new Summer Grunge stamps too.
Having great fun!


INGREDIENTS:
Yupo Card
Sue Wilson Tropical Collection Dies
Graphmaster Acrylic Paint Pens (White)


Tuesday 13 June 2017

Day 18


Good morning.
I thought I would share with you one of the cards I created for Hochanda.
This was using my fabulous "Whale of a Time" stamp sets.
Firstly I created the background using Intense Pigment Stains.  These are pigments which you add water to, to create your own coloured medium, and in this case I added it to a water bottle to create colour misting inks.
The die is one of Sue Wilson's Perspective dies which are incredible.  You can cut "in" and "out" with these dies.  Very underrated in my opinion!
I then used the Popems (links all at the bottom) and painted it with acrylic paint from Creative Expressions, and stamped over the top using my Whale of a time stamp set.
To create the water splashes at the bottom, I sponged some acrylic paint onto the the popems and it gives it a textured feel.
The splashes at the top are created from a stamp from the set, and then I took a wet brush and dabbed out some of the colour and lifted it with a kitchen towel.
It was all then matt and layered onto a 6x6 white card.
Hope you like it.


INGREDIENTS:

Monday 12 June 2017

Day 17

Wow 12th June.... where is this year going.  I am now getting ready to launch my Stitchy Christmas collection, so I have lots of colouring in to do, as I like to have my packaging coloured.  I find it useful as it gives inspiration and help to those who are having a "lack of crafty mojo" kinda day, or those who just need some guidance.

Anyway, I have taken a break so I can share some of my previous Christmas stitchy cards with you... This will be the style of this year's collection, so if you have these, the new stamps will match perfectly.
All of these were coloured with my Graphmaster alcohol markers.
Hope you enjoy a little taster of they style coming very soon!
Hugs.
Lisa xxx


Sunday 11 June 2017

Day 16


Good morning all!
Well today is another busy one, as usual but I had a little card I wanted to share with you.

This is a card from my Summer Grunge collection.
I actually created the background using alcohol inks.
I used Pesto, caramel, and sunshine yellow.
I popped some onto a blending tool with my felt pad on top and literally dabbed all over.
Then I stamped using the Summer Grunge stamps with 2 of the splats.  Remember to use a permanent ink, like a Staz On as it dries quickly on gloss card. Alcohol inks work amazingly with gloss or Yupo card. Yupo is another project coming soon... along with a video.

I used the excess of the card to make a top panel and stamped my Frame It stamps to create 
#ART.  I curved the paper around a ruler to give a curved effect and placed on to of the base layer with foam pads.

How easy was that.  But how effective.
Essentially a card black, plain white card, alcohol inks and a stamp!


Saturday 10 June 2017

Day 15

I am starting to get myself into a routine of blogging and it's becoming addictive.
I've got a few weeks off from the tv and am spending some time sorting out our shop, paperwork and blogging lol!
Today I wanted to share some photos of my recent One Day Special. It was a gruelling schedule but I thoroughly enjoyed my day.


All of these were crested with my stamps (available for purchase in my shop).
The background was created with an ink pad that had mixed colours.
I just stamped the actual pad directly onto the card.
Fabulous effect.
I will be back with more tomorrow so have a fabulous day everyone.
Hugs
Lisa xxx


Friday 9 June 2017

Day 14

Phew I am home and shattered.
Its been a really really busy couple of days but I had an absolute ball.  Hope you all enjoyed the shows, and gained some inspiration and ideas.
I am now working on Christmas for my sins! LOL... Here are a few reminders of last year's projects... I have tons of new ideas for these and they will work amazingly with my new collections due out very soon! Just sayin'........  ;)

Buy HERE


Buy HERE and HERE


Buy HERE


Buy HERE and HERE

Buy HERE

Buy HERE

Buy HERE

Hugs

Lisa xxxx

Tuesday 6 June 2017

Day 11

Well I am off to Hochanda tomorrow so have a few more sneaky peaks to show you.
I will be quiet for a couple of days as I have just tons and tons to do but I am hoping to pop into the studio and grab some photos of the set so I can share these with you.... so watch this space.
Anyway, a few samples from Sue Wilson's die show which is on the 7th June starting at 7am! Oh goodness me that is an early start lol.... 
I will revisit all of these cards when I am back from Hochanda and will give you details on how I created them.


Hugs

Lisa x

Monday 5 June 2017

Day 10

Can you believe it, Day 10 and I am still going! lol....
Long may it continue.
Well I am on my Hochanda countdown, but I thought today I would revisit some old projects that are some of my favourites. These have never been blogged and I thought it was about time I shared them.
I do hope you enjoy them.  I had so much fun with these, and I hope they inspire you to get your craft on.


Please head over to the link below for our brand new blog: https://lisahortoncraft.blogspot.com/